
You know which sun tunnel you want to install, but how do you install a sun tunnel? Find out via the steps below to ensure you have the perfect sun tunnel installation for a naturally lit room!
Table of contents:
How to prepare the roof for a sun tunnel
Step one: Before anything, you will need to check that your roof is between 15° and 60°. This is because installing a sun tunnel on a pitch lower or higher than the advised degrees can reduce the effectiveness of the sun tunnel. It can also cancel out the validity of the warranty.
Step two: On the outside of the roof, check there is nothing risking getting in the way of installation. Sun tunnels are typically recommended to sit at least 4 inches away from valleys and ridges in the roof.
Step three: Check building regulations to determine distances from vent stacks. Checking building regulations is also a key factor for confirming when your sun tunnel can be installed.
Step four: Inside your attic, you will need to check whether the roof is held up by rafters or trusses.
Step five: Measure the distance between the rafters or trusses once you’ve identified them.
Trusses typically do not allow for cutting through, so a sun tunnel for this style will need to fit between the trusses.
Rafters, if properly reinforced, can be cut to allow you to choose from a variety of sun tunnel sizes.
Step six: Make sure that the area is clear. Some examples of potential obstructions include:
- Roof supports
- Electrical wires
- Heat exchanges
- Ducting
This is to ensure there are no damages to those systems during installation. If you do decide to install an electric light kit, plan the path. Typically this will be from the kit to the power source. So ensure it won’t be in the way of your sun tunnel system.

How to choose a sun tunnel
If you’re unsure about how to choose a sun tunnel, check out our sun tunnel guide to find out about recommended sizes, types and more.
How to install a sun tunnel
This will include installing the flashing and then the tunnel itself.
What you need
- Hammer
- Phillips head screwdriver
- Drill
- Tape measure
- Flat crowbar
- Box cutter
- Jigsaw
- Chalk line
- Shingles
- Nails
- Felt paper
- Sealant
- Staple gun
How to install sun tunnel flashing
Step one: Mark the area where you’re planning to install the sun tunnel, preferably in the potential centre, and place a nail or wire through the ceiling to mark the location.
Step two: Go to the attic and find the area where you have pushed the wire through. On the vertical point from the roof deck, hammer a roofing nail to mark that same mark inside the attic and the roof above.
Step three: Measure the distance from the mark on the ceiling to the mark on the roof deck. This can help when determining the length of the rigid tunnel needed during installation.
Step four: In the room where your sun tunnel will be, find the starting mark from step one. With a marking tool, mark the hole for the ceiling ring. Tracing the upper edge of the ceiling ring is recommended for an accurate size.
Step five: Cut the hole where the sun tunnel will be installed.
Step six: Insert the ceiling ring. Secure it in place with pre-attached fasteners.
Step seven: Go to where you marked the roof for the ceiling ring. Again, mark this area to note the installation location. You can do this by placing the tunnel and marking the circle using the inside of the tunnel.
Step eight: On the top half, remove roofing materials from that area. This will be covered with flashing later during installation.
Step nine: Mark semi-circles at the top and bottom of the flashing hole using the inside of the tunnel. You can extend the semi-circles to the edge of each rafter/truss below, but make sure not to cut into it if you have rafters that aren’t properly reinforced.
Step ten: You will need to mark a hole that is 1½ inches larger than the selected sun tunnel’s diameter.
Step eleven: Mark the rough opening for the flashing by connecting the lines along the sides of the rafters/trusses.
Step twelve: You will need to use a jigsaw to cut a rough opening – make sure to drill a starting hole prior to making cutting the opening easier.
Note: Attach a board wider than the hole to the piece being cut out. This can make the wood easier to pull away, acting as a plug, to make sure the inside of the circle doesn’t fall out.
Step thirteen: Use a broom to clean away the debris from the area and add sealant in a ring around the outside of the opening. This will provide further weather protection to the flashing following its installation.
Step fourteen: Install the flashing section in place onto the wooden section of the roof and screw it in place with screws.
Note: To help reduce the risk of leaking through the screw holes, coat the screw heads with a layer of sealant.
Step fifteen: Cover part of the top collar of the flashing with underlay material to provide further drainage support.
Step sixteen: Install roofing material around the flashing. Make sure to leave a 5-8-inch gap between the underlayment, as well as the vertical panel of the flashing.
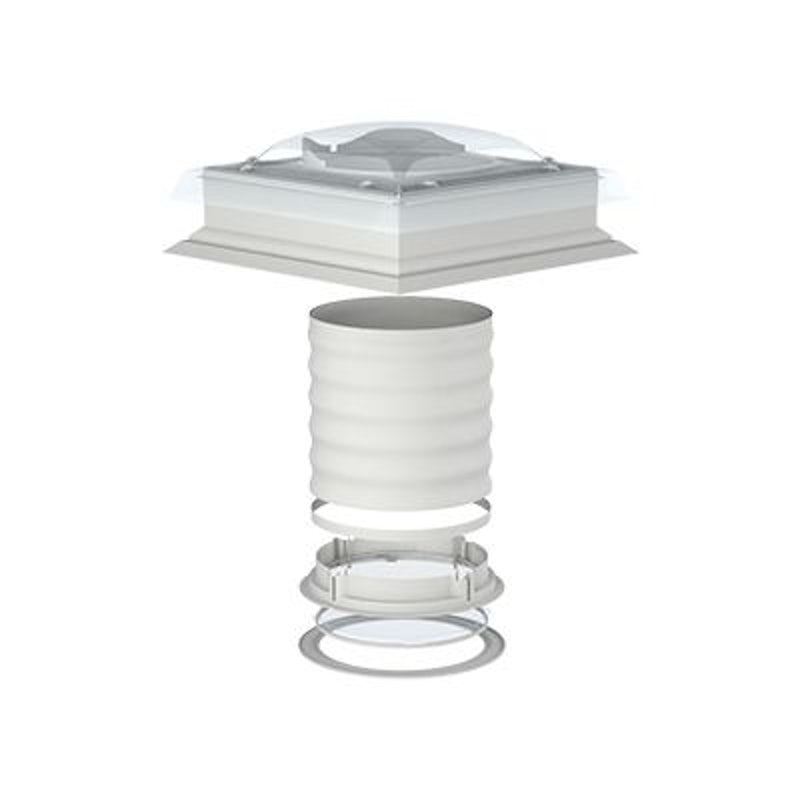
How to install the tunnel
This will include steps about how to install a rigid tube. A flexible tube can be used as a cheaper solution, but preferably for shorter distances due to loss of light because of the ribbed design.
Step one: Take your tunnel pieces and remove the protective film before using clips to assemble tunnel sections and elbow components.
Note: elbows work best at the top and bottom of tunnel sections.
Step two: Check the tunnel fits through the rough opening by testing it in place through the rough opening. Make any adjustments as necessary.
Step three: Once the tunnel has been adjusted to fit well in place, take out the tunnel from the opening and tape all tunnel seams to ensure they stay as closed and connected as possible.
Step four: Re-insert the tunnel into place. From there you can position the dome in place and screw it into position on the top of the flashing.
Step five: Go back to the inside room where you marked and cut a hole in the ceiling. Secure the tunnel to the ceiling mount with screws.
Step six: Install the diffuser with the frosted side facing down. Secure it in place by rotating the plastic locks to hold it in position.
Step seven: Centre the trim ring under the ceiling mount and line up the tabs with the notches. Push it upward and rotate it to secure it in place.
Step eight: Ensure insulation is pushed around the tunnel and diffuser assembly.
There you have it! Your newly installed sun tunnel.
Note: Always check manufacturer instructions when installing a sun tunnel.

Was this guide useful?
Mentioned in this project guide:


