
15th February 2023
For your insulation to keep your home warm and help reduce money on your energy bills, you need to make sure it – and your walls – are protected from harmful moisture making its way from the inside.
That’s exactly where vapour control layers (VCL) come in, saving the day by stopping the outward movement of water vapours into your insulation and bricks.
You’re probably wondering:
How do you install a vapor barrier membrane?
What’s more:
Where do you install a vapour barrier?
At Roofing Superstore, we’re here to help!
Read on to find out how to install a vapour control layer.
Spoiler alert – it’s easier than you might think!
Table of contents:
- What is a vapour control layer?
- Vapour control layer building regulations
- How to install a vapour control layer
- Final thoughts
What is a vapour control layer?

A vapour control layer, also known as a vapour barrier membrane, is a layer which stops moisture from entering your wall’s cavity and introducing mould and rot. The technical term for this process is ‘interstitial condensation’.
The thing is:
If left untreated, interstitial condensation can lead to serious structural problems as well as long-term health issues for you and your family. But with the help of a VCL membrane, the structure will be able to cope with any small amounts of moisture that might make it through.
And that’s not all:
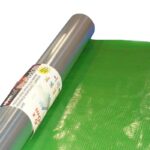
A vapour control barrier will help improve your energy efficiency and reduce heat loss. It can be made from a wide array of materials, but the most common options are polythene membrane (at least 125 microns thick) and foil backed plasterboard. This barrier is always applied on the warm (internal) side of the insulation on walls and in lofts.
Vapour control layer building regulations
NHBC Standards 6.2.12 require that all new builds have an approved VCL fixed to the warm side of all insulation and cover the external framed wall area. It must be fitted at 250mm centres to the top and bottom of frames, around openings, at laps and wherever there has been any damage.
In addition, a VCL layer must have a minimum vapour resistance of 250 MNs/g in order to be considered valid.
So, provided you’ve purchased a suitable moisture barrier, you’re now ready to install it.
How to install a vapour control layer

As we’ve noted, vapour barrier installation is essential on walls and roofs.
Here’s what you’re going to need to complete the task:
- Vapour control layer
- Staple gun
- Adhesive tape
- Sealant adhesive
- Tape measure
- Stanley knife
Once you’ve assembled everything, simply follow these steps.
Step 1: Prepare the area & measure up
Clean and dry the area you’ll be working on. Measure the surface, adding approximately 10cm on top of the measurements to ensure an overlap between each sheet and around joints. This will stop moisture from entering under the membrane.
Step 2: Apply the vapour control layer
Roll out the VCL and use your Stanley knife to cut it to size. Depending on how large each sheet is, you might need a second pair of hands to do this comfortably.
Then, carefully staple the vapour control layer to each timber frame at regular distances.
Step 3: Seal the edges of the membrane
How do you stick a vapour barrier to the wall?
Use adhesive tape to seal the seams of the vapour barrier membrane for walls, making sure everything is nice and airtight.
Step 4: Glue the edges of the membrane to the wall
Next, apply a thick bead of adhesive to the wall in order to glue the VCL securely to the wall. You can then cut any surplus to ensure a neat finish.
That’s all it takes! Say goodbye to interstitial condensation!
Final thoughts
Sturdy vapour control layers are instrumental in protecting your walls and insulation from condensation and structural damage, boosting your energy efficiency and keeping you and your family safe and healthy.
The good news is:
Vapour barrier installation is quick and easy and – so long as you’ve ensured continuous sealing and kept penetrations to a minimum – a highly effective solution.
And now that you know exactly how to install a vapour control layer, you should be able to take care of it in no time.

Was this guide useful?
Mentioned in this project guide:


