A beam is the main load-bearing structural element of a roof. It supports the weight of joists and other building elements.
On the other hand, a joist is a horizontal member that generally runs across a building and is supported by a beam.
But going beyond the basic definitions:
What’s the difference between a beam and a joist?
That’s what we’re here to find out!
So, without further ado, let’s jump right in.
Table of contents:
- What’s the difference between a beam and a joist?
- What is a roof beam?
- What is a roof joist?
- How to find a ceiling joist
What’s the difference between a beam and a joist?
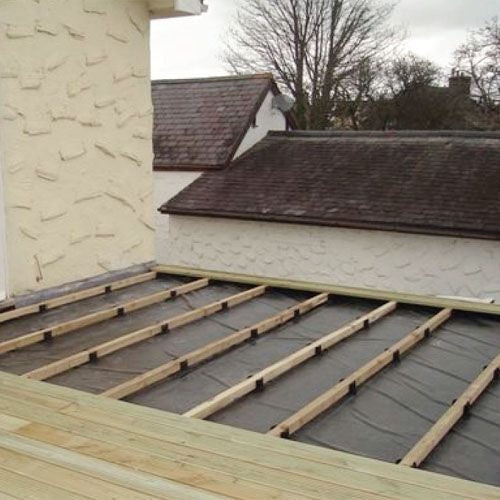
Let’s start with the basics:
The beam supports the joists.
In fact, there’s usually only one beam supporting many joists, but they’re just as important to the overall structure. Looking up at a roof from the shell of a house, for example, you’d see one long beam running through the length of the home, with multiple joists ‘leaning’ to it for support.
What is a roof beam?
A roof beam is a load-bearing member that is integral to the strength of the building. It supports the floor or roof above while adding integrity to the walls. In addition, it also supports joists, trusses and other roofing elements. A roof beam will be the thickest and most important element of a roof or levels within a property.
Now:
There may be more than one roof beam, but they will usually span the entire length of the space. Typically, roof beams are made of timber, but you can choose from concrete, manufactured wood and steel beam solutions. Roof beams may support the weight of the floor above or the roof, but they are also a vital component of structural integrity.
Why is that?
Put simply, roof beams attach to walls and stop them from spreading or leaning in.
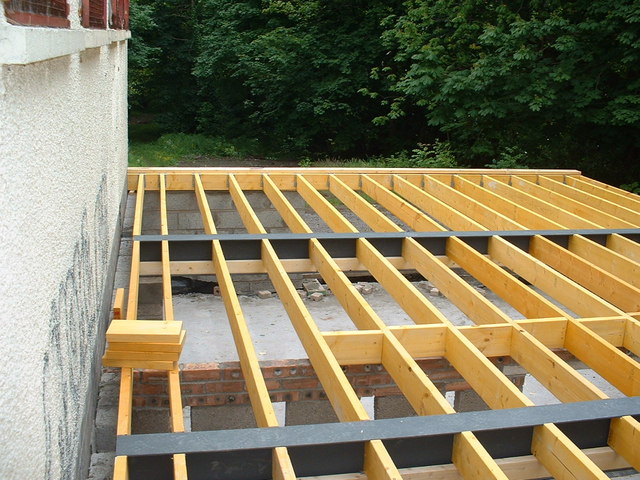
The image below shows metal beams supporting many timber joists.
What is a roof joist?
A roofing joist is a horizontal member that runs across an open space. Depending on the construction, joists may lie flat or be pitched. They can be concealed or exposed, and there will be more joists than beams.
Roof joists generally join opposing walls and support the ceiling below and/or the floor above. They are typically made of timber and come in a variety of thicknesses and lengths depending on the specifications of the building. Steel, concrete and manufactured wood are also commonly used to create roof joists.
Roof joists also support walls but to a lesser degree. They are secured to the sidewalls of a property and help stop those walls from spreading or leaning in.
This is important:
Replacing beams and joists is something that is best left to a professional contractor, as sufficient support must be in place during the process, and the correct beam and joist sizes must be used.
How to find a ceiling joist

Finding a ceiling joist might not be simple, but it can be done! It’s worth noting that ceiling joists are typically around 16 or 24 inches apart. So once you have discovered one, the others should be easy to find.
It’s also worth noting that if you only need to know the direction of the joists and have easy access to the attic, you can find out which way they run up there.
The thing is:
Joists are normally exposed when it comes to attic spaces. So it’s worth checking there for a quick answer.
However, if you need to know the exact location, see the steps below.
What you will need
- Stud finder
- Torch
- Nail
- Hammer
- Ladder
- Dust mask (recommended)
- Protective glasses (recommended)
- Tape measure
Before using your stud finder, it is advised you calibrate the stud finder against an area you know won’t have joists to find the base density area for a hollow area. This way, you can find a solid area and know the difference for easier joist findings.

Step one – Positioning the ladder and calibrating the stud finder
Place your ladder next to a sidewall of the room and hold the stud finder up to the ceiling, making sure it is a few inches away from the wall. Make sure to calibrate the stud finder according to manufacturer instructions.
Note: Stud finders do not perform well with popcorn ceilings as they have difficulty assessing the density to find the joists – if you have a popcorn ceiling, skip to step six.
Step two – Measuring and locating each joist
Using your measuring tape, measure 16 inches in from the wall and run the stud finder over that area of the ceiling. The stud finder should light up when it has reached the edge of the joist. A stronger signal will typically indicate the centre of the joist.
If the machine does not light up, measure 24 inches from the wall and run your stud finder across this area. You can also use your hand to knock on the ceiling when measuring to see if there is a solid or hollow sound. The solid sound indicates the presence of a joist.
Having said this:
If you have heavy insulation between the joists or there is dense stucco coating, it can be difficult to identify a hollow sound.
Note: If you still cannot find a joist at the recommended measurements, it could be running in a different direction across the room and may need measuring from a perpendicular wall.
Step three – Adjusting for obstacles and alternative directions
Once you have found the first joist, note whether this was 16 or 24 inches away from the wall and run the stud finder over the area to confirm its placement.
You’re now ready to find the next joist!

Step four – Identifying and confirming joist placement
Your first joist will determine where you look for the next joist. If 16 inches away from the wall, measure this distance away from that joist to find the next. If 24, the same measuring rules apply. You can then run the stud finder across this area to ensure you are in the right place.
Continue this process across the ceiling.
Step five – Using a torch to find indents
Take your torch and hold it close to the ceiling, angling it so the light shines almost horizontally across the surface. You will need to find indents in the paint which typically show that a nail is behind the plaster. The joist will typically be behind the plaster.
Step six – Testing and confirming joist location
Place a nail onto the surface, 16 inches in from the wall, and hammer it in place. This will be a test as to whether there is a joist under the surface.
Now:
If the nail penetrates the ceiling without hitting a solid, move the nail an inch away from the section and check again. If still no luck, measure 24 inches in from the wall and check again as required.
Congratulations – you’ve now successfully found your ceiling joists!
Note: If you have to repeatedly hammer the nail into the ceiling or your ceiling is covered in a material that releases dust (such as an embellishment or plaster), wear a dust mask and protective goggles.
Looking for joist seals? We’ve got you covered!
For advice on your next roofing project and working with beams and joists, call our friendly team on 01752 692 760. Alternatively, use the live chat function in the bottom right-hand corner of our website.


