
Laying a fibreglass roof requires many important steps. You will need to follow them carefully to ensure that the roofing lasts. That’s why we’ve created this guide to show you what you need to do to complete your project in just four steps and ensuring your new fibreglass roofing is in top condition for years to come.
Table of contents
- Before you lay your fibreglass roof
- How to lay a fibreglass roof in four steps
- Cleaning tools and equipment
Before you lay your fibreglass roof
There are a few things you will need to do before you lay a fibreglass roof.
Check the weather forecast
Always check the local weather forecast to ensure the conditions are acceptable. You do not want to lay a new roof that will be subject to moisture as this could cause problems in future.
Keep resin or topcoat temperature below 35°C
Do not use resin or topcoat in temperatures above 35 degrees Celsius. This will cause the material to melt and lead to a poor finish.
Mix small batches of resin
Always mix smaller batches of resin than you normally would. This allows adequate time to apply it before it starts to catalyse.
Apply laminate in the shortest runs possible
Always apply the laminate in the shortest runs possible across a roof. The shorter the length of the laminate, the less likely it is that the resin will harden too quickly.
Wait to use a topcoat if the roof’s exposed to sunlight
If possible, topcoat the roof out of direct sunlight or wait until later in the day before applying it. This may mean the roof will take you longer to complete, but it will save you time and money by having to re-topcoat it at a later date if the job is not done adequately the first time.
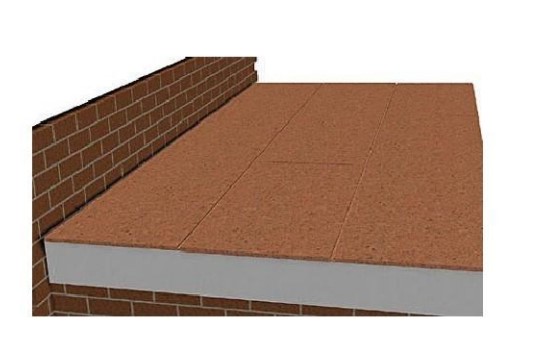
Use OSB3 boards
Why use OSB3 boards? Well, here’s why:
- 2.4m X 0.6m X 18mm tongue and grooved boards.
- Designed to minimise expansion and contraction.
- Easy to handle and carry up ladders.
- Doesn’t need edge support between joists.
- Doesn’t need to have bandaged joints.
How to lay a fibreglass roof in four steps
Each step requires an extensive process. We’ve dedicated the following sections to each process in depth. So, here’s what you need to do with each one for a suitable fibreglass roof.
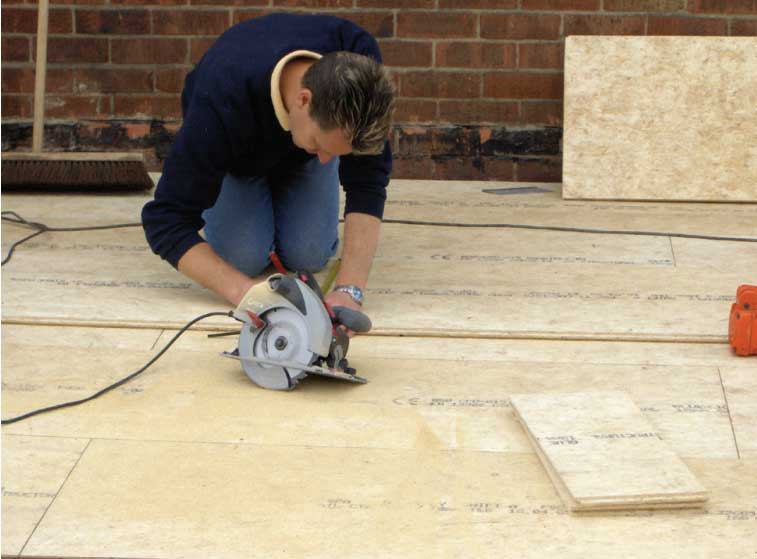
Step one: Prepare the deck
If the substrate is unfit for laying boards onto directly, you must remove the surface.
When laying decking, it is important to remember that the decking board will absorb moisture if it comes into contact with water. Any moisture trapped within the roof will cause board movement and risk joint failure. As with laying the laminate, ensure that conditions are dry before decking the roof.
After removing the old decking, check that all roofing joists are sound and free from rot. Replace these as required. If possible, build a fall into the substrate. This will allow the roof to drain completely and remain free from standing water.
Laying the deck
Lay 18mm OSB3 boards lengthways at 90° to the roof joists. They must lay with the writing side uppermost. This gives a better key for the laminate and allows the resin to flow into the board joint, effectively glueing the boards together.
Start to lay the boards at the furthest edge from the drip. If you are laying the board along a wall, leave an expansion gap of 25mm. Align the end of the board with the fascia, laying the following boards from end to end. Trim the last board in the row flush with the fascia.
If the gap is greater than 400mm, use the offcut to start laying the next row of boards. Fit the tongue firmly into the groove of the row already laid. The boards are now staggered and bonded and will form a strong deck.
After laying the two rows, align the boards to run straight, fixing them as you go. Continue to lay each row in turn, using the offcut from one row to start the next row. The last row is cut off in line with the fascia.
You must ensure you lay the deck correctly. A poorly laid deck may result in porosity in the laminate.
When fixing the boards to timber joists, the most efficient way is to use compressed air or a gas-powered nail gun. This will minimise any potential damage to the ceiling below. You must use a 63mm (or longer) galvanised ring shank nail at 200mm centres, usually four nails across a 600mm board. Make sure to drive each nail into a joist.
Some installers may wish to use screw guns. This is acceptable providing the screws have a minimum of 40mm penetration into the joist. You can also nail the boards using a hammer. Though this is time-consuming and will probably lead to internal damage to the ceiling. All ring shank nails must be non-rusting (galvanised or sheradised).
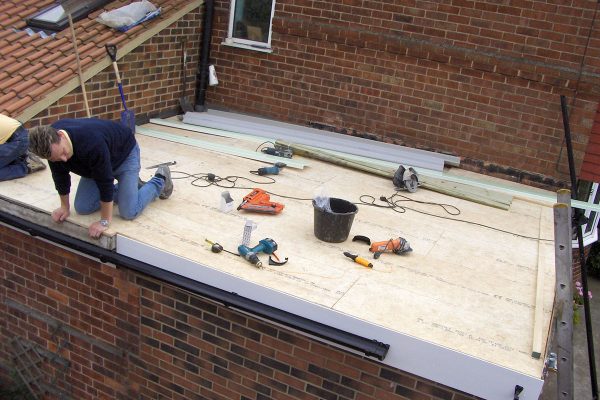
Step two: Fitting the edge trims
Edge trims are manufactured in GRP. One side has a high adhesion finish (matt finish), and the other side has a glossy finish. Always bond to the matt finish.
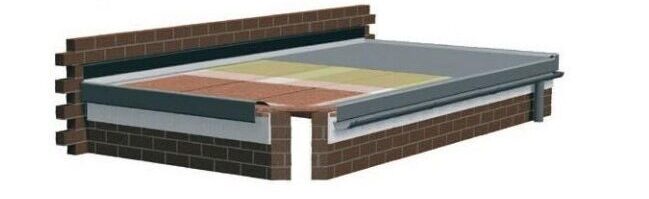
Fixing trims
You must fix all trims with nails or staples to the decking board. Trims are either nailed to the decking boards using a 13mm galvanised clout nail. The alternative is to staple the trims in place with a gas-powered or compressed-air stapler.
Having said that, the above is an exception for the F300 Flat Flashing and the D260 Angle Fillet. For these, you must bond the trims in place using Polyurethane (PU) adhesive. Silicone sealant or general-purpose mastics are not suitable adhesives for the fixing of trims.
Apply PU adhesive with a skeleton gun to the batten around the perimeter of the roof. A 30mm bead at 300mm centres is enough to hold the trims in place. The trims should be ‘rubbed’ into place to ensure a good bond.
Next hold the trim in place ensuring the face is vertical. Drive fixings in at each end, then in the middle and then at 200mm centres thereafter.
Joining trims
To join lengths of trim together, apply a bead of PU adhesive to the inside of one length of the trim and fit it to overlap the other by 50mm.
Step three: Preparing for laminating
Avoid spillages by masking off the roof properly. Using a consolidator roller can cause a fine spray, which the wind can carry. It is important to consider this before using resin on the roof. When the resin has cured, there is no easy way of removing it from car paintwork without also removing the paint, for example.
Mixing the resin
GRP roofing resin is supplied in tins of 20kg (approximately 18.5 litres). The graduation of mixing buckets is litres. This allows easy calculation of the amount of catalyst (the hardener which resin requires for it to cure) needed. Though this will depend on the ambient temperature.
To remove the lid from the tin, you must use a four-to-six-inch nail to bend back the lugs. It is very important to stir the resin before use too. This ensures the styrene and wax that has settled at the bottom of the tin get thoroughly mixed in.
Prepare enough tins of resin to complete the day’s laminating at this stage. Not doing so means mistakes such as using unmixed resin are difficult to rectify later. The resin to CSM (chopped strand mating) ratio is 1.35kg of resin for every m2 of glass. However, allow 1.5kg for every 1m² to cover waste and difficult details.
To start, it is good practice to mix a small quantity of resin (1 or 2 litres). This allows you to laminate the corners and bandage the trims. It will also give the best sign of the curing time of the remaining resin and confirm if the correct amount of catalyst has been added to the mix. Ideally, it is best to aim for a curing time of between 20 to 30 minutes.
Catalyst addition
There are many important rules to follow when deciding how much catalyst to add:
- Never use less than 1% or more than 4% catalyst.
- Never underestimate the effect of temperature. Resins will not cure at or below freezing and will always cure much quicker in direct sunlight.
- When top coating late in the day, add more catalyst to allow for the lack of sunlight.
- For winter, use a fast catalyst. For summer, use a standard catalyst. In very hot conditions, use LPT (Long Process Time) catalyst.
Remember: Any catalysed resin left in the bucket will exotherm. Heat generates as the resin cures, so keep it well away from other stored materials. Pour water over the resin to suppress the heat gain.
Always mix the catalyst into the resin thoroughly before using the resin (a couple of minutes for a 10-litre bucket.) Failing to do so can result in ‘streaking’ on the laminate. This is where streaks of uncured resin will remain visible and lead to a failure in the laminate.
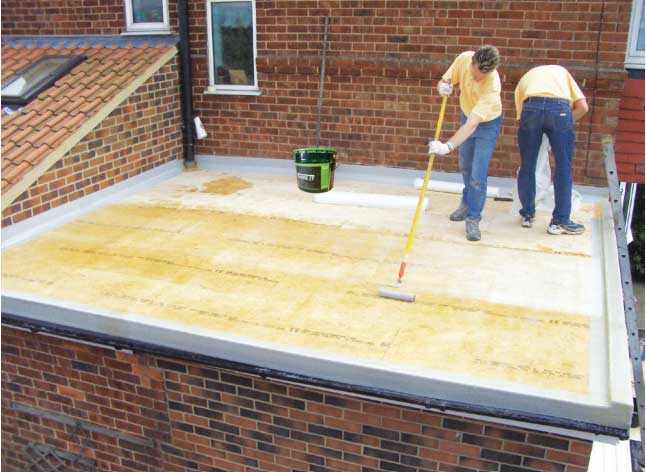
Laying the chopped strand mat
Before laying the chopped strand mat out, the deck must be clean and dry, and all the trims fixed in place. The mat has a cut edge and a feathered edge. Always overlap the feathered edge on top of the cut edge.
The mat is usually best laid parallel to the drip trim. Start by rolling the mat out. Overlapping the trim by at least 50mm, but not over the edge of the trim. Leave the ends long at this stage.
Roll out each 1m wide strip overlapping each time by at least 50mm right across the roof. Use a Stanley knife to cut off the ends into the corner of the trim to leave a neat, straight edge. Decide on the best place to finish laminating the roof from. Roll the mat up to the furthest point from the ladder.
Leave the rolls on the roof where they have been laid out to avoid any mix-up if there is a deviation in size or angle from one length of mat to another. Cut 200mm squares of the mat for each corner and 200mm strips of bandage for each trim joint.
Corners
For corners, lay a 200mm square piece of mat on the roof deck ‘wet out’ (I.e. make the surface more absorbent by treating with a wetting agent) on both sides with well-mixed, catalysed resin (see catalyst addition) using a 2½” polyester roller.
Place the mat onto the face of the corner trim with the bottom edge on the radius of the trim. Fold around the corner and fold over the top of the trim down onto the deck. It will be easier to dress and feather if you cut the mat vertically from the top corner of the trim upwards.
Using the 2½” roller, 2” paintbrush and small consolidating roller, feather the corners into place. You must bandage any joints in the trims using the same mix of resin and the same technique as the corners. If any boards are not completely engaged in these joins, you must bandage these too. Even a small gap may cause the resin to leak through the boards which will lead to porosity in the laminate.
For any nails holding the trims that you are not covering with the main laminate on the deck or corners, laminate them with a small piece of mat. You can laminate the deck of the roof before the corners and bandages have cured.

Laying the main laminate
You must follow these instructions to gain the correct ratio of resin to glass.
Unroll 1m of the previously cut mat along the lowest part of the roof and align it so it can be unrolled across the roof without running offline. Carefully roll the mat back.
Add 1/3rd resin to the board, 2/3rd to the mat
To get a ratio of 3:1 (1.5kg resin: 0.45kg CSM), apply one-third resin on the board and two-thirds resin on the mat. Dip the 7” polyester roller into the bucket of the catalysed base resin. Lift the roller out of the bucket, without letting the excess runoff, and drop three rollers’ full onto the board to coat 1m². This will ensure that there is a ratio of one-third resin on the board.
Unroll the mat onto the resin-coated board. In strips of 7” (1 roller width), wet out the mat by dropping one roller full in the middle of each 7” run. Push the roller away to the end of the 1m run, then pull back over the full 1m. This will ensure even coverage.
Continue across the 1m² (approximately six runs). Then roll the roller over the whole area again to ensure good even coverage. Wet out the next 1m² of the board in the same way, not forgetting to use one-third of the resin on the board and two-thirds of resin on the mat. Roll out the mat over the next 1m² of wet outboard and continue to roll out the resin as previously described.
Let the resin soak into the mat to break down the emulsion binder for two to three minutes.
Paddling and wetting
Using the paddle roller and applying a little pressure, roll back and forth along the two edges and the end of the wetted-out mat. Now roll the paddle roller over the whole of the wet-out mat. Ensure the paddle roller makes at least two passes over the whole area.
In colder weather, the resin will be thicker and will take a little longer to wet out. When a laminate is correctly wetted out it should be transparent. There should be no white or opaque areas.
Things to check for
As we mentioned earlier, take care near the edge of the roof and in windy conditions. The roller will emit a fine spray and this spray can travel a considerable distance.
Make regular close inspections of the laminate during its consolidation. Look for ‘pinholes’ and areas short of resin. Pinholes in the laminate will lead to porosity and water penetration.
On all overlaps of the mat, pay extra attention to the ‘feathering in’. This will improve the overall appearance of the finished roof.
Step four: Preparation for top coating
Taking care and paying attention at this stage will produce a roof of superb appearance.
Using a sanding pad with 40-grit sandpaper, lightly sand the corners and trim the bandages. Sand off any unsightly fibres, taking care not to sand too heavily on the corner itself as this may lead to holes appearing.
Cut any excess cured mat protruding beyond the trim with a sharp Stanley knife. Seal any edges with abutting walls using a clear silicone sealant. Fit any C100 simulated lead flashing before top coating and seal off with a clear silicone sealant.
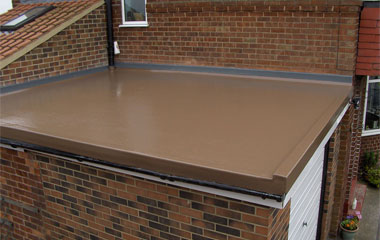
Top coating the roof
The topcoat is a resin. Treat this in the same way as the base resin. It requires the addition of catalyst for it to cure.
Always try to apply the topcoat immediately after the laminate is semi-cured (it can be walked on, with no stickiness.) If this is not possible, ensure the top coating is carried out within 24 hours to gain a good bond with the laminate. If you leave the top coating longer than 24 hours, wash the laminate with acetone. This will help to gain a good cross-polymerisation of the topcoat to the laminate.

Mixing the topcoat
Calculate how much topcoat you will need to use to cover the main body of the roof (topcoat is applied at a rate of 0.5kg/m2.) Add the required amount of catalyst and stir well.
If the roof needs a coloured topcoat, rather than the standard pre-pigmented grey, you must add a colour pigment to a clear topcoat. A 20kg tin of topcoat requires 2kg of colour pigment. You must also mix the pigment thoroughly into the topcoat. This helps avoid patchiness and uneven colour.
Remove the lid and stir the topcoat well before use. Ensure the styrene & wax at the bottom of the tin is fully mixed in. Pour enough topcoat out into the mixing buckets to cover the perimeter of the roof (including the edge trims.)
Applying the topcoat
Using the 7” polyester roller, cover the remaining laminate with just enough topcoat for the fibre pattern to be visible. Do not coat the roof too thickly or the topcoat will crack.
Use a 2½” Polyester roller to coat the trims. A roller will get a better and more even finish than a paintbrush. Roll the topcoat along the face of the trim. Hold the roller at an angle to the bottom of the trim to cover half of the radius return on the front of the trim. To protect the fascia from the topcoat, hold a piece of flashing trim against it as you topcoat the radius on the underside of the trim.
Cleaning tool and equipment
Once you’ve finished your fibreglass roof, you can clean your tools for the next job. Use disposable latex gloves when handling catalysts and resins or clean hands with an appropriate hand cleaner. Do not clean your hands with acetone.
Painter wipes are also a useful addition to your toolkit. As well as cleaning hands they are good for removing resin from windows and fascias.
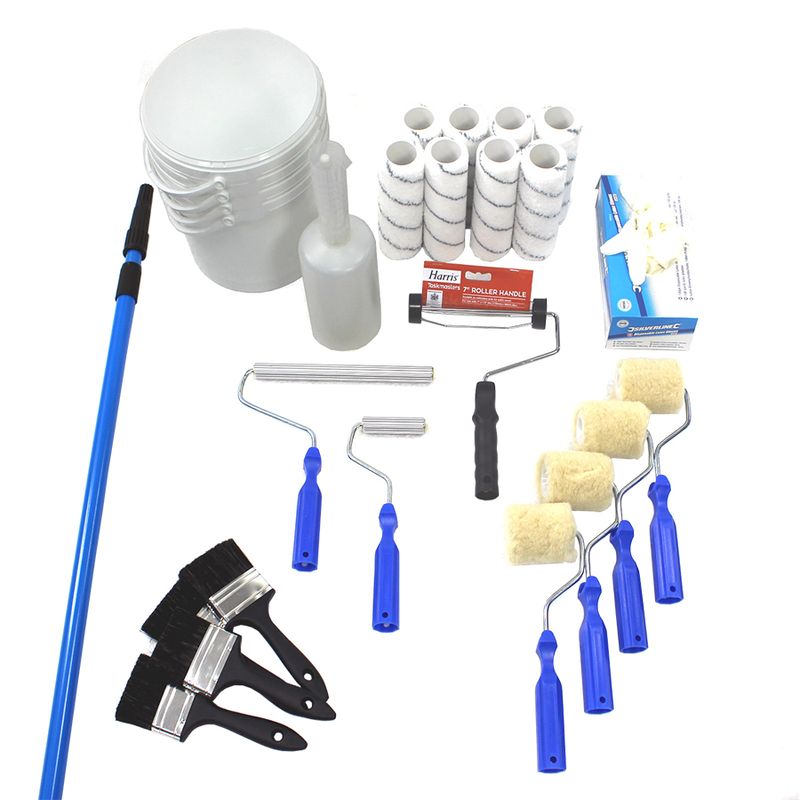
How to clean a bucket
Buckets can be re-used for many jobs. After finishing each mix, coat the inside of the bucket. When the resin has cured after approximately 30 minutes, you can peel it out. This leaves the bucket like new and ready for the next job.
How to clean paintbrushes
You can drop paintbrushes into a resealable container of acetone/hardener and leave it for the next job. Only use paintbrushes that have unpainted or uncoated handles. This is because the coatings will come off and contaminate the resin.
How to clean polyester rollers
Polyester rollers have sleeves that are removable. It is very time-consuming to clean the roller sleeves. So, unscrew the nut with pliers and drop the used sleeve into the bucket of used resin.

There you have it! Four steps to laying a fibreglass roof. Don’t wait to check out our wide range of roofing solutions to ensure your new roof is suitable for your requirements.

Was this guide useful?
Mentioned in this project guide:


