
Chipboard flooring is one of the most popular uses of chipboard. Whilst it can be used for many different applications, this guide will take you through what sort of chipboard you need for flooring and its many benefits. For most homeowners, it is a cost-effective and functional alternative to more expensive wooden flooring, giving you the best of both worlds.
Table of contents:
- What is chipboard?
- The benefits of using chipboard flooring
- How to lay chipboard flooring
- Chipboard flooring sizes
- Final thoughts
What is chipboard?
Chipboard is a wooden board product that is manufactured from wood chips and particles that are glued together using adhesive at high pressure. Chipboard is used in a wide range of applications including flooring, doors, work surfaces, low-cost furniture and more. It is available in normal density, medium density and high density.
The benefits of using chipboard flooring
Why is chipboard used for flooring?
In short, it is cost-effective, has specific manufacturing suited to laying seamless flooring, and is moisture-resistant.
Cost-effective
Chipboard is a low-cost material. Laying it as flooring is a great way to stay within budget whilst not compromising on other features. Chipboard is strong and durable because the wood fibres do not run uniformly down the wood, making warping, splintering and splitting less likely.
Developed for flooring use

Specific chipboard has been designed specifically to be used as flooring, meaning that it is easy to lay, and has specific features that make laying a chipboard floor quick and easy. These features include tongue and groove connections, a finished face that makes laying flooring on top easy, and panel sizes that are easy to transport and handle.
Moisture resistant
Moisture-resistant chipboard flooring products are available from Caberfloor. They have been designed to avoid one of the main disadvantages of chipboard. Regular chipboard often absorbs water, which causes swelling and damage.
When P5 moisture-resistant chipboard is exposed to intermittent rain or water, the chipboard will retain the majority of its original strength and structure. Moisture-resistant chipboards are typically green to indicate their moisture-resistant characteristics. It is important to note that moisture-resistant chipboard is not waterproof, but it is possible to take extra steps to waterproof your chipboard if required.
Different grades available
There are different grade chipboard products available, depending on the project they are being used for. For most projects, the recommended grade of chipboard would be P5, which is suitable for a wide range of applications. Alternatively, if working on a project with heavy loads where non-domestic floors are being created, the P7 heavy-duty grade moisture-resistant chipboard would be most suitable.
How to lay chipboard flooring
Depending on the chipboard flooring product you use, the method of how to lay a chipboard floor can vary between manufacturers and product ranges. However, we’ve outlined a brief guide to fitting chipboard flooring to demonstrate the potential steps involved in laying a chipboard floor.
Pre-installation guide
Before installation, it is important to store the boards in the room they will be fitted for a minimum of 48 hours. This will allow them to become conditioned to the environment, with shrinkage or swelling occurring and settling before installation. This means that warping and shrinkage are less likely to occur when the floor has been laid which can cause structural issues and an uneven floor. Additionally, it is important to ensure that all joists are dry, and no chipboard should be left in wet conditions.
Connecting chipboard flooring
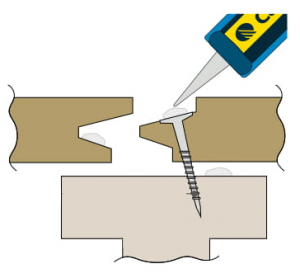 If working with tongue and groove chipboard flooring panels, it is recommended to use adhesive to secure the chipboards. Firstly, apply a continuous bead of adhesive to the joists and noggins on which the chipboard panels will be laid. Then lay a chipboard flooring panel down, adding a screw to the tongue at each tongue and groove joint, to secure it to the joist below.
Please Note: The screw(s) should be at 150mm centres along the joists and no closer than 10mm towards the board’s edge. You can find out why it’s important to leave a 10mm gap here.
Once this is finished, add a bead of adhesive to the tongue and groove joint on top of the screw. Push the adjacent panels together using the tongue and groove connection.
Leaving a gap
When laying the chipboards, ensure there is at least a 10mm gap around the perimeter of the flooring. This gap will allow for expansion, preventing buckling from occurring, which can result in an uneven floor surface. You should lay tongue and groove chipboard flooring in a staggered formation, to spread the weight distribution across the joists below. The long edges should run across the joists, whilst the shorter edges should finish at the centre of the joists.
chipboard flooring sizes
The most common chipboard flooring thicknesses are 18mm and 22mm, both of which we stock here at Roofing Superstore. These are generally used to create subfloors, and the thickness of chipboard you use depends on the size of your joist centre.
The joist centre is the measurement from the middle of one floor joist to the next. If your joist centre is 400mm or less, then we recommend using an 18mm thickness. For measurements over 400mm, opt for the 22mm thickness. The chipboard we stock is also moisture resistant, so is ideal for applications such as kitchens, lofts, bathrooms, and more.
Final thoughts
Chipboard flooring is affordable, durable, and versatile.
Its affordability makes it a cost-effective option for subfloors and underlayment, providing a stable and even surface for the final flooring material. Chipboard is also incredibly versatile, and you can easily cut it to fit various spaces.
It has good dimensional stability and strength, making it suitable for supporting heavy loads.
As a DIY project, laying chipboard flooring can be pretty challenging depending on your skill levels.
While the process involves measuring, cutting and securing the boards, it’s certainly within the reach of many DIY enthusiasts, especially with the availability of instructional resources.
And now that you know how to lay chipboard flooring, this includes you!

Was this guide useful?
Mentioned in this project guide:


