19th January 2026
VELUX roof windows can be installed in 5 easy steps. They allow natural light into your property, increase ventilation, and boost the potential selling value. In this guide, we will carefully explain how to fit a VELUX window onto a tiled roof. The process is almost identical when you’re looking for information on how to fit a VELUX window onto a slate roof, which is always useful to know.
Before we get started, here are some key FAQs:
-
Can you install a VELUX window yourself?
The simple answer is yes. Using this guide, you’ll find that the installation process isn’t as difficult as it sounds.
-
Do you need planning permission for VELUX windows?
For the most part, no. Of course, there are some exceptions, e.g. installing roof windows at the front of your property, facing a street, or fitted in a listed building. For a more detailed breakdown, check out the Planning Permission regulations for the UK and Wales.
-
Do you need scaffolding to install VELUX windows?
No. Most VELUX windows can be fitted or replaced from the inside of the property if there is access. Some rare occasions where scaffolding or ladders may be needed are when the roof pitch is particularly steep, or the window needs to be fitted in a part of the roof that is difficult to access.
We are using a standard centre-pivot window, in this case. If you want to find installation guides for centre-pivot, top-hung or VELUX INTEGRA windows, you can find links to our guide at the bottom of the page. So, once you’ve chosen the perfect VELUX window for your home, how do you fit it?

To install a VELUX roof window, you’ll also require the corresponding flashing kit, as well as an insulation collar and vapour barrier.
Table of contents
- Step 1: Unbox the VELUX roof window
- Step 2: Remove the sash from the frame
- Step 3: Establish the window opening
- Step 4: Install the frame
- Step 5: Install the flashing kit
- Alternative VELUX installation guides
- Final thoughts

Step 1: Unbox the VELUX roof window
The first step is to unbox the VELUX window. It is essential to do this properly to avoid damaging the window.
First, lay the box flat. Press the tabs in and pull the box outwards – this will form a solid base. You can use this to work on, without damaging the window.
Within the box, you’ll find the VELUX window, a box containing installation brackets and fixings, and the hood section. There is also an installation guide – there are different instructions depending on the type of flashing you have.
- If you’re going to fit a VELUX window to a tiled roof, you will need a VELUX EDW flashing kit.
- If you’re going to fit a VELUX window to a slate roof, you will need a VELUX EDL flashing kit.
 Therefore, if you are using an EDW flashing kit for a tiled roof, you will follow the red colour-coded instructions in the installation guide. Alternatively, if using an EDL flashing kit to install your VELUX window on a tiled roof, you’ll follow the blue colour-coded instructions.
Scan the QR code on the installation guide to access useful and relevant installation videos and advice if you need to.
In this case, we are working with a standard centre-pivot window with EDW flashing, meaning the red colour-coded instructions are relevant.
Step 2: Remove the sash from the frame
Stand the window upright and remove the polystyrene blocks at the top of the window. Then push the control bar up and inwards, to open the window. Take the polystyrene blocks from the control bar, and put them on the top of the window sash. Next, fully rotate the window sash until the polystyrene blocks are resting on the floor. Now disconnect the sash from the frame using the button on the hinges to do so. Place the sash somewhere safe.
Step 3: Establish the window opening
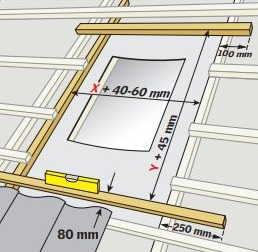
The width of the opening in the roof should be around 40-60mm wider than the window itself. Take the lower installation batten, and fix it so that the top edge is approximately 80mm above the first course of tiles below the window. Ensure it is level, and measure upwards – add 45mm to the length of the window and mark this point – fix the upper installation batten here.
Make sure both battens overlap the width of the opening on each side – by 100mm on the top, and 250mm on the bottom.
Trim back any excess felt and fit it over the battens – this will help to provide extra waterproofing. Once this has been done, remove the course of tiles below the window opening.
Step 4: Install the frame
Fit the insulation collar
Simply clip the corners of the insulation collar together, then put it into position in the window opening, ready for the frame to be installed.
Fix the brackets
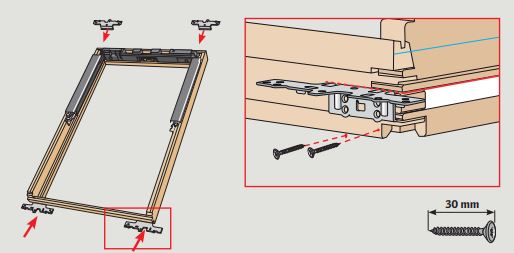
Fix the brackets to the window, following the instructions in the installation guide. You’ll see a red line and a blue line running down the side – make sure you use the correct colour according to the flashing kit you are using, and install the brackets along the line. In this case, we are following the red instructions as we are using EDW flashing, so the brackets are fitted along the red line, at the top and bottom of the window. Position the brackets over the pre-drilled pilot holes, then screw the bracket into place.
Now place the frame over the window opening. Fully fix the bottom brackets of the frame onto the supporting batten, using 30mm and 80mm screws. Ensure that the screws go through both the batten and counter batten and into the rafter if the roof has one. At the top of the window, use a 30mm screw in one of the horizontal holes on each bracket, but ensure it is left 10mm out, instead of being screwed in completely.
If desired, you can remove the part 5 flashing sections at this point – it may make it easier to put the sash on and off.
Make adjustments if required
Put the sash back into the frame, by lining up the curved hinge on the sash with the corresponding slots in the window frame. Now, look at the gap between the sides of the sash and the frame in the window. If the gap is larger at the top than the bottom on one side, use a crowbar to make a slight adjustment, pulling the outer edge of the frame across slightly to square the window up.
Next, open the window and look at the bottom opening, ensuring the gap between the sash and the frame is even. If not, take the black wedge supplier in the flashing box, and insert it into the bracket on the top corner that is opposite to the wider opening side. This will prop the frame up slightly, evening out the opening between the sash and the frame.
Once any necessary adjustments have been made, remove the sash from the frame again – just press the hinge buttons to disconnect and remove it. The frame can be fixed properly now, so screw in the screws that had been left 10mm out previously. Then add the 80mm screws, ensuring they secure both the battens and rafters.
Fit the underfelt collar
Mark the position of the transverse drainage gutter – this should be placed at an angle, to allow sufficient runoff, in case water runs down the roofing felt. If you have counter battens, remove a section of the counter batten to fix the gutter to the rafter. Cut a flap in the felt, along where the gutter will be fixed, and add sealant to the edges of the slit.
Now position the underfelt collar around the window frame – the end with the longer material goes at the top. Remove the strips on the underfelt collar that protect the sealant, and stick the collar to the edges of the window frame, ensuring the corner flaps are placed around the frame securely. Then staple the collar around the roof battens, and make cuts at the bottom to dress it around any counter battens.
At the top, fix the gutter into place, then fold the underfelt collar over and into the gutter. Cut off any excess material, then dress the flap in the roofing felt into the gutter, securing it into place with the clips provided.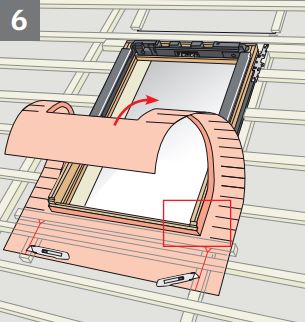
Step 5: Install the flashing kit
Chamfer tiles if required
With profiled tiles, they should be chamfered below the window to ensure that the highest point of the tile is a maximum of 130mm from the bottom of the window. This will help to allow the bottom apron of the flashing to sit neatly whilst also allowing water runoff.
Install the apron flashing
 Take the bottom apron section of the flashing and put it into position. Shape the flashing over the tiles, ensuring it is pushed around the tile profiles. Then bend the pleated section back 45 degrees – this will help it sit tightly over the tiles. Now put it back into position and screw it into place, using part 2 of the flashing kit – make sure it is being fixed to the side of the frame.
Install the side flashing
Take the side flashings and slide them into place – fix them with the tabs, by folding the tabs over and inserting a nail. If you haven’t already removed the part 5 flashing parts, do this now.
Install the side frame covers & hood
The next step is to fit the side frame covers. Simply place them into position, and click them into place. Once this has been done, refit the part 5 flashing parts – slot them into the black housing at the top of the window, and ensure they click into place at the hinge.
Now screw the hood section into place, before finally positioning the top flashing piece and fixing it into place using fold-down tabs on either side of the window.
Finish tiling
Once the flashing kit is installed, the tiling can be finished off around the window. Cut the foam gasket on the side and top of the flashing to ensure it matches the profile of the tiles where they meet. Don’t forget to allow a 60-150mm gap at the top of the window between the tile and the window for easy drainage of rainwater.
Fit the vapour barrier
The last stage is fitting the vapour barrier. Dress it into the internal lining rebate of the window, using the tool provided in the kit, then fix it into place in each corner with the screws. Finally, tape it to the building’s existing vapour barrier to prevent any moisture from entering the roof structure.
Alternative VELUX installation guides
- VELUX centre-pivot installation guide
- VELUX top-hung window installation guide
- VELUX INTEGRA window installation guide
Final thoughts
You should now feel confident on how to fit a VELUX window yourself. The steps are summarised below. As always, if you’re unsure about any DIY projects, it may be worth contacting a professional for help.
- Unbox the window and refer to the colour coded instructions
- Remove the sash from the frame
- Ensure the opening is 40-60mm wider than the window before positioning
- Fit the insulation collar
- Fit the brackets
- Fit the underfelt collar
- Install the flashing kit, starting with the bottom apron, followed by the sides, then the side frame covers and hood
- Finish tiling and fit the vapour barrier
If you have any questions or queries about the installation of VELUX windows onto a roof, feel free to call our team on 01752 692 760 or use the live chat. They will be more than happy to help with product suggestions and advice.
Was this guide useful?
Mentioned in this project guide:


